개요
지난 문서까지 Todo리스트를 추가하였고, 잠깐 Retrofit 예제를 수행했다. 이번엔 둘을 결합하여 retrofit으로 영화 정보를 얻어온 뒤 리사이클러뷰에 뿌려주는 예제이다. 마찬가지로 livedata, databinding 등을 활용한다.
개발 과정
- Retrofit으로 데이터 얻어오기
- RecyclerView 관련 코드 수정 및 추가
- 그 외 소스 코드 수정
1. Retrofit으로 데이터 얻어오기
이전 문서에서 관련된 내용을 설명했으므로 자세한 설명은 생략한다.
MovieService 인터페이스
package com.example.sampleapp.retrofit

import androidx.lifecycle.LiveData
import retrofit2.Call
import retrofit2.http.GET
import retrofit2.http.Query
interface MovieService {
    @GET("movie/upcoming")
    fun getUpcomingMovie(
        @Query("api_key") api_key : String="API-KEY",
        @Query("language") language : String="en-US", //korean: ko-KR
        @Query("page") page : Int =1
    ): Call<UpComingMovie>
}
RetrofitAPI
package com.example.sampleapp.retrofit

import com.google.gson.GsonBuilder
import retrofit2.Retrofit
import retrofit2.converter.gson.GsonConverterFactory

object RetrofitAPI {
    private var instance : Retrofit? = null
    private val gson = GsonBuilder().setLenient().create()

    fun getInstnace() : Retrofit {
        if(instance == null){
            instance = Retrofit.Builder()
                .baseUrl("https://api.themoviedb.org/3/")
                .addConverterFactory(GsonConverterFactory.create())
                .build()
        }
        return instance!!
    }
}
DataModel
data class UpComingMovie(
    @SerializedName("page") val page: String,
    @SerializedName("results") val movieList: List<Movie>
)

data class Movie (
    @SerializedName("title") val title: String,
    @SerializedName("original_title") val original_title: String,
    @SerializedName("poster_path") val poster_path: String,
    @SerializedName("overview") val overview: String,
    @SerializedName("backdrop_path") val backdrop_path: String,
    @SerializedName("release_date") val release_date: String
)
Repository.kt 수정
package com.example.sampleapp


class Repository(application: Application) {
	...
    private val retrofit: Retrofit = RetrofitAPI.getInstnace()
    private val api = retrofit.create(MovieService::class.java)

	..

    fun getMovieData(): LiveData<List<Movie>> {
        val data = MutableLiveData<List<Movie>>()

        api.getUpcomingMovie().enqueue(object : Callback<UpComingMovie> {
            override fun onResponse(call: Call<UpComingMovie>, response: Response<UpComingMovie>) {
                data.value=response.body()!!.movieList
            }
            override fun onFailure(call: Call<UpComingMovie>, t: Throwable) {
                t.stackTrace
            }
        })
        return data
    }
}
d RetrofitAPI의 구현체를 이용하여 인터페이스의 getUpcomingMovie를 통해 UpComingMovie 객체를 얻어온 뒤, MutableLiveData<List<Movie>>에 movieList를 설정하여 반환한다. 이 함수는 후에 ViewModel에서 호출된다.
2. RecyclerView 관련 수정 및 추가
받아온 데이터를 리사이클러뷰에 보여주기 위한 ListAdpater를 구현한다. 또한 item_movie.xml 도 적절히 정의한다.
MovieAdapter.kt
class MovieAdapter(val movieItemClick: (Movie) -> Unit, val movieItemLongClick: (Movie) -> Unit):
    ListAdapter<Movie, MovieAdapter.ViewHolder>(
        MovieDiffUtil
    ) {

    override fun onCreateViewHolder(parent: ViewGroup, viewType: Int): ViewHolder {
        val layoutInflater = LayoutInflater.from(parent.context)
        val binding = DataBindingUtil.inflate<ItemMovieBinding>(layoutInflater,viewType,parent,false)
        return ViewHolder(binding)
    }

    override fun getItemViewType(position: Int): Int {
        return R.layout.item_todo
    }

    override fun getItemCount(): Int {
        return super.getItemCount()
    }


    override fun onBindViewHolder(holder: ViewHolder, position: Int) {
        val movie = getItem(position)
        holder.bind(movie)
    }

    inner class ViewHolder(private val binding: ItemMovieBinding):RecyclerView.ViewHolder(binding.root){
        fun bind(movie: Movie) {
            binding.movie = movie
            binding.executePendingBindings() //데이터가 수정되면 즉각 바인딩

            binding.root.setOnClickListener {
                movieItemClick(movie)
            }
            binding.root.setOnLongClickListener {
                movieItemLongClick(movie)
                true
            }
        }
    }

    companion object MovieDiffUtil: DiffUtil.ItemCallback<Movie>(){
        override fun areItemsTheSame(oldItem: Movie, newItem: Movie): Boolean {
            //각 아이템들의 고유한 값을 비교해야 한다.
            return oldItem==newItem
        }

        override fun areContentsTheSame(oldItem: Movie, newItem: Movie): Boolean {
            return oldItem==newItem
        }
    }


}
기존의 TodoAdpater와 거의 변화가 없다. 다만 객체가 Todo에서 Movie로 바뀐 정도의 차이과 그 외 네이밍의 차이 뿐이다.
item_movie.xml 생성
<?xml version="1.0" encoding="utf-8"?>
<layout xmlns:android="http://schemas.android.com/apk/res/android"
    xmlns:app="http://schemas.android.com/apk/res-auto"
    xmlns:tools="http://schemas.android.com/tools">

    <data>
        <variable
            name="movie"
            type="com.example.sampleapp.retrofit.Movie" />
    </data>

    <androidx.cardview.widget.CardView
        android:layout_width="match_parent"
        android:layout_height="wrap_content"
        android:layout_margin="4dp">

        <androidx.constraintlayout.widget.ConstraintLayout
            android:layout_width="match_parent"
            android:layout_height="match_parent">
            <ImageView
                android:layout_width="50dp"
                android:layout_height="50dp"
                android:id="@+id/item_tv_initial"
                android:textSize="30dp"
                android:padding="4dp"
                android:background="@android:color/darker_gray"
                android:layout_marginTop="16dp"
                app:layout_constraintTop_toTopOf="parent"
                app:layout_constraintStart_toStartOf="parent"
                android:layout_marginStart="16dp"
                tools:text="H"
                app:imageUrl="@{movie.poster_path}"
                android:gravity="center"
                app:layout_constraintBottom_toBottomOf="parent"
                android:layout_marginBottom="16dp"/>

            <TextView
                android:layout_width="wrap_content"
                android:layout_height="wrap_content"
                android:id="@+id/item_tv_title"
                android:textSize="20dp"
                android:textStyle="bold"
                app:layout_constraintStart_toEndOf="@+id/item_tv_initial"
                android:layout_marginStart="16dp"
                tools:text="@{movie.title}"
                android:layout_marginTop="8dp"
                app:layout_constraintTop_toTopOf="parent"
                app:layout_constraintBottom_toTopOf="@+id/item_tv_descript"/>

            <TextView
                android:id="@+id/item_tv_descript"
                android:layout_width="wrap_content"
                android:layout_height="wrap_content"
                android:layout_marginTop="4dp"
                app:layout_constraintTop_toBottomOf="@+id/item_tv_title"
                app:layout_constraintStart_toStartOf="@+id/item_tv_title"
                android:layout_marginBottom="8dp"
                app:layout_constraintBottom_toBottomOf="parent"
                tools:text="@{movie.overview}"/>
        </androidx.constraintlayout.widget.ConstraintLayout>
    </androidx.cardview.widget.CardView>
</layout>
레이아웃은 그대로 사용한다. 데이터 바인딩을 위해 movie 변수를 추가하고 이미지뷰에는 포스터, 텍스트뷰에는 타이틀과 오버뷰값을 설정해주엇다.
ImageBindingAdapter.kt 수정
package com.example.sampleapp.adpater

object ImageBindingAdapter {
    @BindingAdapter("imageUrl")
    @JvmStatic
    fun loadImage(imageView: ImageView, url: String){
        val baseUrl = "https://image.tmdb.org/t/p/w500/"
        Glide.with(imageView.context).load(baseUrl+url).error(R.drawable.ic_launcher_background).into(imageView)
    }
}
Retrofit으로 받아온 포스터 경로는 baseUrl 변수 뒤에 붙여서 전달되어야 한다.
그 외 소스코드 수정
MainViewModel.kt 수정
class MainViewModel(application: Application): AndroidViewModel(application) {
	...
    private val movies = repository.getMovieData()

	...
    fun getMovieData():LiveData<List<Movie>>{
        return movies
    }
}
레포지토리에서 데이터를 얻어온다. getMovieData는 xml에서 bindingAdapter(databinding)를 통해 호출될 예정이다.
MainActivity.kt 수정
 private fun deleteDialog(todo: Movie) {
        val builder = AlertDialog.Builder(this)
        builder.setMessage("Delete selected contact?")
            .setNegativeButton("취소") { _, _ -> }
            .setPositiveButton("편집") { _, _ ->
                val intent = Intent(this, AddActivity::class.java)
                intent.putExtra(AddActivity.EXTRA_TODO_TITLE, todo.title)
                //intent.putExtra(AddActivity.EXTRA_TODO_DESC, todo.description)
                //intent.putExtra(AddActivity.EXTRA_TODO_ID, todo.id)
                startActivity(intent)
            }.setNeutralButton("삭제"){_, _ ->
                //lifecycleScope.launch(Dispatchers.IO){viewModel.delete(todo)}
            }
        builder.show()
    }

    private fun setRecyclerView(){
        // Set contactItemClick & contactItemLongClick lambda
        val adapter =
            MovieAdapter({ movie -> deleteDialog(movie) },
                { movie -> deleteDialog(movie) })

        binding.recyclerView.adapter=adapter
        binding.recyclerView.setHasFixedSize(true)
        //viewModel.logMovieData()
    }
두 함수만 수정해준다. deleteDialog 함수는 어색함이 있지만 다음 문서에서 처리할 예정이다. 그리고 어답터는 TodoAdpater에서 MovieAdpater로 바뀌었다.
activity_main.xml 수정
        <androidx.recyclerview.widget.RecyclerView
            android:id="@+id/recyclerView"
            android:layout_width="0dp"
            android:layout_height="0dp"
            android:layout_marginTop="16dp"
            app:layout_constraintBottom_toTopOf="@+id/main_button"
            app:layout_constraintEnd_toEndOf="parent"
            app:layout_constraintStart_toStartOf="parent"
            app:layout_constraintTop_toBottomOf="@+id/textview"
            app:listData="@{viewModel.movieData}"
            app:layoutManager="androidx.recyclerview.widget.LinearLayoutManager"
            tools:listitem="@layout/item_todo" />
RecyclerView의 listData만 수정해준다. 기존의 <List<todo>>에서 todo가 movie로 바뀐 결과를 가져온다.
RecyclerViewBindingAdapter.kt 수정
object RecyclerViewBindingAdapter {
    @BindingAdapter("listData")
    @JvmStatic
    fun BindData(recyclerView: RecyclerView, movies: List<Movie>?){
        val adapter = recyclerView.adapter as MovieAdapter
        adapter.submitList(movies)
    }
}
xml에 movie 리스트 전달을 위해 Adater를 MovieAdapter로 바꾸어주고, 전달받는 매개변수도 movie 리스트로 매개 변수도 바꾸어 주었다.
마무리
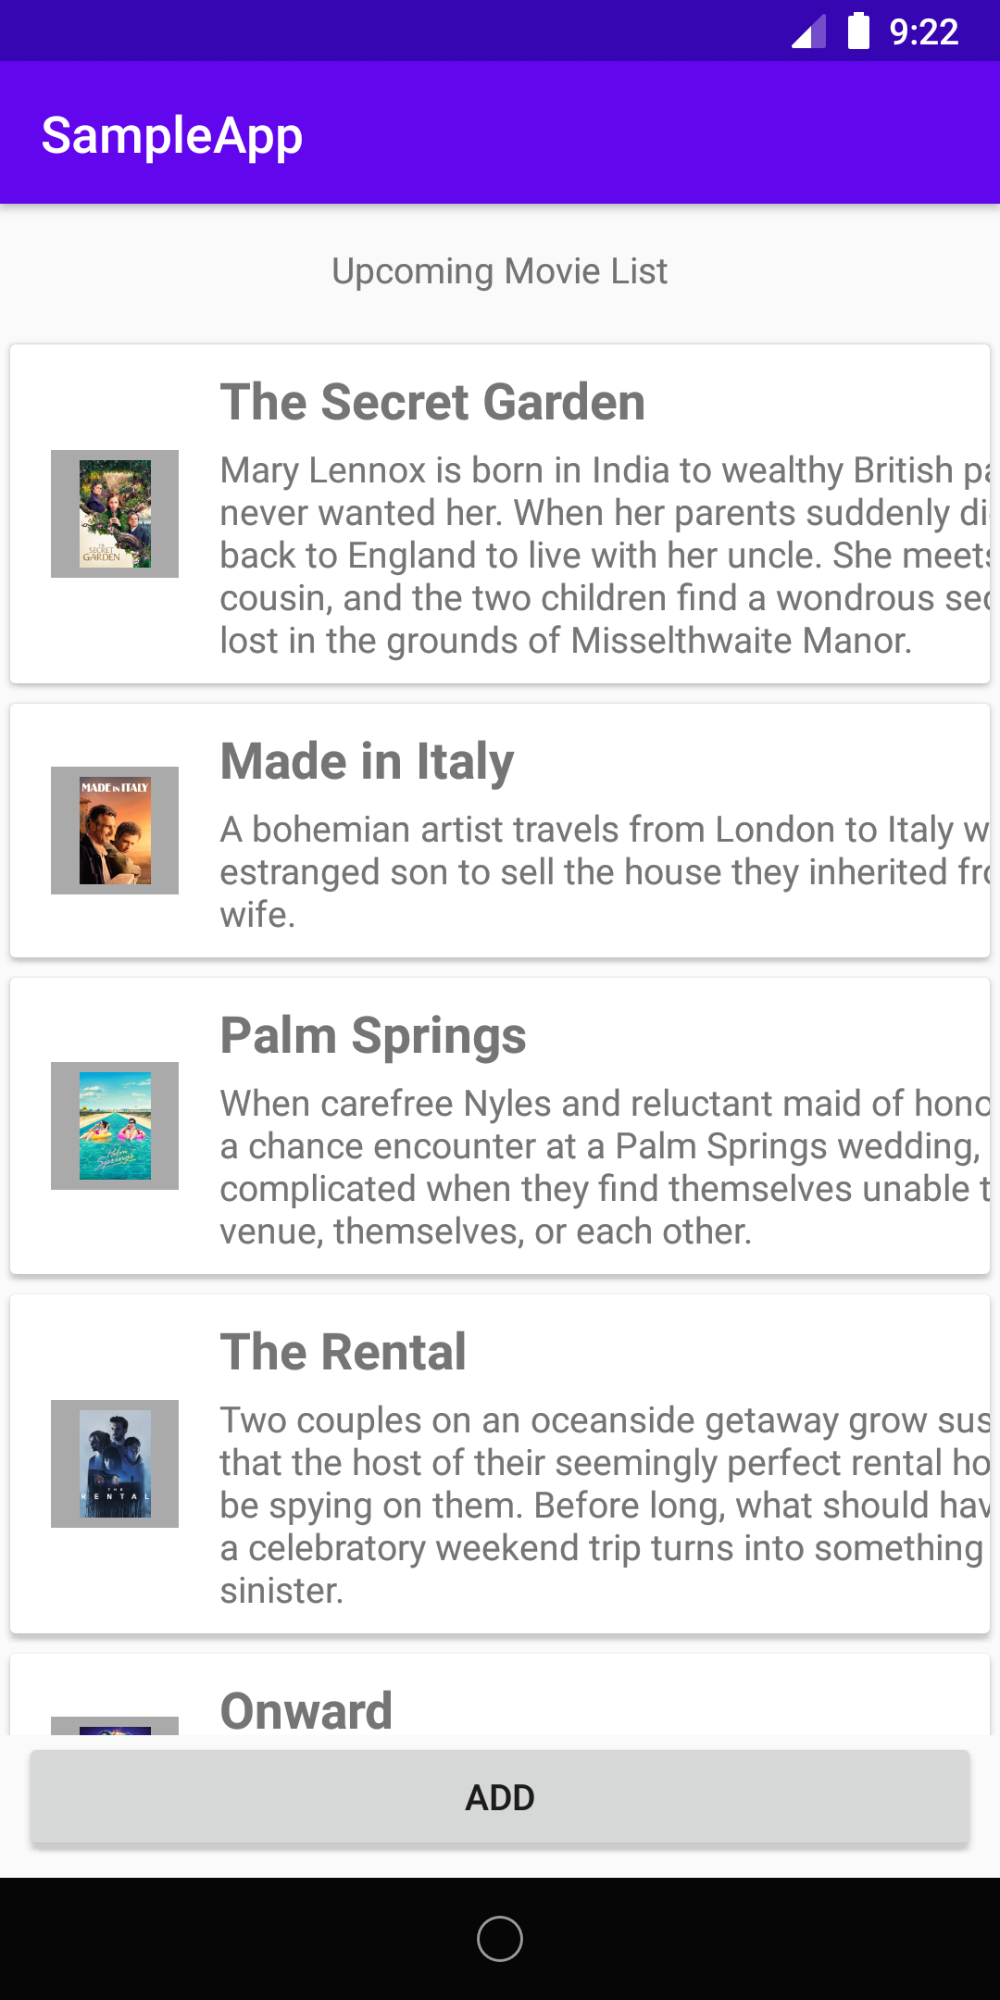
이를 통해 아래와 같은 결과 화면을 볼 수 있다. 이제 추가할 부분은 탭을 두개로 나누어 하나는 Upcoming 영화목록을 보여주고 하나는 보고싶은 영화목록을 보여주는 탭을 구현할 예정이다. Upcoming 영화 목록 중 아이템을 선택하면 Room DB에 내용이 저장되어 두번째 탭인 보고싶은 영화목록에 나타난다. 이 탭을 두개로 나누는 과정은 이전에 학슴한 navigation 컴포넌트를 활용할 예정이다. 추가로 아래 오버뷰 텍스트를 보면 우측에 글자가 잘린 모습이다. 이 또한 수정할 예정이다. 그리고 더 많은 영화 목록을 보여주기 위해 무한 스크롤도 구현할 것이다.

참고1. https://acaroom.net/ko/blog/youngdeok/%EC%97%B0%EC%9E%AC-%EC%BD%94%ED%8B%80%EB%A6%B0-%ED%94%84%EB%A1%9C%EC%A0%9D%ED%8A%B8-02-5%EB%8B%A8%EA%B3%84-retrofit%EC%9D%98-rest-api%EC%9D%98-%EC%B2%98%EB%A6%AC
참고 2. https://proandroiddev.com/mvvm-architecture-viewmodel-and-livedata-part-1-604f50cda1
'안드로이드' 카테고리의 다른 글
| [안드로이드] 예제: MVVM+AAC를 이용한 RecyclerView 9 - Swipe, Drag&Drop으로 아이템 삭제 및 순서 변경 (0) | 2020.08.24 |
|---|---|
| [안드로이드] 예제: MVVM+AAC를 이용한 RecyclerView 8 - Navigation 컴포넌트 활용 (0) | 2020.08.21 |
| [안드로이드] 예제: Retrofit 라이브러리를 사용하여 영화 정보 얻어오기 (0) | 2020.08.17 |
| [안드로이드] 예제:MVVM+AAC를 이용한 RecyclerView 6 - ListAdapter (1) | 2020.08.16 |
| [안드로이드] 예제:MVVM+AAC를 이용한 RecyclerView 5 - BindingAdpater (0) | 2020.08.15 |

