이전 문서 리뷰
전 문서에서 Jetpack의 navigation을 통해 MainActivity에서 코드 한줄로 bottomNavigationMenu를 통한 프래그먼트 전환이 가능했다. 이번에는 navigation의 argument, actions를 알아볼 것이다.
Argument
말 그대로 화면에서 받을 인자를 설정할 수 있다. 기본적인 int, float 뿐만 아니라 enum 등도 가능하고 배열도 전달이 가능하다. 이를 통해 우리는 Bundle을 통한 값을 전달하는 과정을 더 이상 하지 않아도 된다.

Actions
액션은 네비게이션의 이동에 대한 속성이다. navigation xml 파일에서 한 프래그먼트를 우클릭하면 다양한 액션이 가능한 걸 확인할 수 있다.
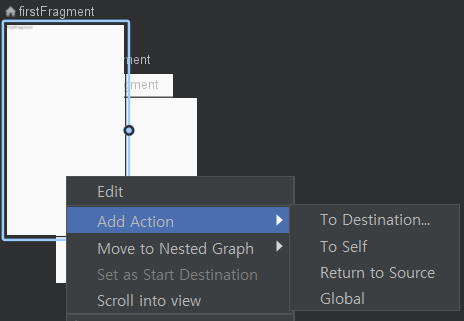
위 기능들을 실제 활용하는 예제를 아래에서 소개한다.
1. Fragment 생성
TwoDepthFragment라는 이름을 갖는 프래그먼트를 하나 생성한다. 그리고 해당 프래그먼트의 xml은 다음과 같이 수정한다.
<?xml version="1.0" encoding="utf-8"?>
<androidx.constraintlayout.widget.ConstraintLayout xmlns:android="http://schemas.android.com/apk/res/android"
    xmlns:app="http://schemas.android.com/apk/res-auto"
    xmlns:tools="http://schemas.android.com/tools"
    android:layout_width="match_parent"
    android:layout_height="match_parent"
    android:background="@android:color/darker_gray"
    tools:context="com.example.navigation.fragments.TwoDepthFragment">

    <Button
        android:id="@+id/button"
        android:layout_width="wrap_content"
        android:layout_height="wrap_content"
        android:text="title_depth_second"
        app:layout_constraintBottom_toBottomOf="parent"
        app:layout_constraintEnd_toEndOf="parent"
        app:layout_constraintStart_toStartOf="parent"
        app:layout_constraintTop_toTopOf="parent" />

    <TextView
        android:id="@+id/txt_two_depth"
        android:layout_width="wrap_content"
        android:layout_height="wrap_content"
        app:layout_constraintBottom_toBottomOf="parent"
        app:layout_constraintEnd_toEndOf="parent"
        app:layout_constraintStart_toStartOf="parent"
        app:layout_constraintTop_toBottomOf="@+id/button"
        tools:text="TextView" />
</androidx.constraintlayout.widget.ConstraintLayout>
2. Navigation에 추가
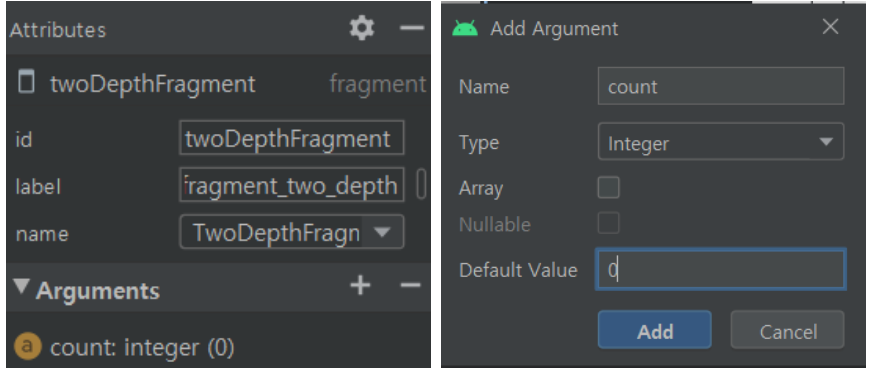
이전의 방법처럼 위 프래그먼트를 navigation에 추가한다. 그리고 count라는 int형 argument를 하나 추가한다.
3. FirstFragment에서 TwoDepthFragment로 이동하기
FirstFragment를 클릭한 후 TwoDepthFragment로 드래그하면 간단하게 액션이 생성된다. 그리고 TwoDepthFragment를 우클릭하여 global 액션도 추가해준다. Global 액션은 특정 출발지 이외의 다른 모든 곳에서도 접근이 가능해진다. 이 결과로 TwoDepthFragment로 이동하는 두개의 액션이 생겼다.

4. 실제 이동을 위한 actvitiy 수정 및 xml 수정
먼저 이동할 버튼을 xml에 추가해준다.
 <Button
        android:id="@+id/move_depth_btn"
        android:layout_width="wrap_content"
        android:layout_height="wrap_content"
        android:text="MoveToTwoDepth"
        />
그리고 먼저 앱을 빌드하면 우리가 저번 문서에서 설정한 safeArgs 덕에 방금 추가된 action, argument와 관련된 클래스와 메서드가 자동으로 생성된다. 그리고 액티비티에는 다음과 같이 클릭 리스너를 추가한다.
FirstFragment에서의 TwoDepthFragment의 이동
override fun onViewCreated(view: View, savedInstanceState: Bundle?) {
        super.onViewCreated(view, savedInstanceState)

        view.move_depth_btn.setOnClickListener {
            view.move_depth_btn.setOnClickListener {
                val direction: NavDirections = FirstFragmentDirections.actionFirstFragmentToTwoDepthFragment(10)
                findNavController().navigate(direction)
            }
        }
    }
위에서 처럼 만들어진 클래스 이름은 [ID]+Directions의 형태로 생성되며 메서드는 xml의 action id값을 참조하여 생성된다. 그리고 메서드 괄호 안에 argu를 전달할 수 있다. 저 버튼을 클릭하면 10이라는 값이 TwoDepthFragment로 전달되며 화면이 전환된다.
AnyFragment에서의 TwoDepthFragment의 이동
그리고 SecondFragment에서는 글로벌 액션을 통한 TwoDepthFragment로의 이동을 보일 것이다. 이를 위해 FirstFragment에 추가한 버튼을 똑같이 생성한다. 글로벌 액션은 특정 프래그먼트에서의 이동이 아니기 때문에 nav_main.xml의 이름을 발췌한 NavMainDirections 클래스가 생성되고 actionGlobalToTwoDepthFragment 메서드가 생성된다.
override fun onViewCreated(view: View, savedInstanceState: Bundle?) {
        super.onViewCreated(view, savedInstanceState)

        move_depth_btn.setOnClickListener {
            val direction: NavDirections =
                NavMainDirections.actionGlobalTwoDepthFragment(5)
            findNavController().navigate(direction)
        }
    }
5. Argument를 전달받기
Fragment에서는 정의한 Argument들은 by navArgs<[Navigation ID]Args>로 받을 수 있다.
그전에 by 문법을 사용하기 위해선 build.gradle(:app) android 안에 다음을 추가해준다.
android {
   ...
    kotlinOptions {
        jvmTarget = JavaVersion.VERSION_1_8.toString()
    }

}
그리고 TwoDepthFragment를 다음과 같이 수정하면 결과를 확인할 수 있다.
class TwoDepthFragment : Fragment() {
    val twoDepArgs by navArgs<TwoDepthFragmentArgs>()
    override fun onCreateView(
        inflater: LayoutInflater, container: ViewGroup?,
        savedInstanceState: Bundle?
    ): View? {
        // Inflate the layout for this fragment
        return inflater.inflate(R.layout.fragment_two_depth, container, false)
    }

    override fun onViewCreated(view: View, savedInstanceState: Bundle?) {
        super.onViewCreated(view, savedInstanceState)
        view.txt_two_depth.text = twoDepArgs.count.toString()
    }

}
결과

FirstFragment에서는 10, SecondFragment에서는 5의 값이 정상적으로 전달된 모습이다.
'안드로이드 > JetPack' 카테고리의 다른 글
| [안드로이드] 프래그먼트 스택 (feat. 네비게이션) (0) | 2021.01.04 |
|---|---|
| [안드로이드] Paging Library 개요 (0) | 2020.12.31 |
| [안드로이드] 7. Navigation (0) | 2020.08.10 |
| [안드로이드] 6. DataBinding (0) | 2020.08.10 |
| [안드로이드] 5. ViewModel을 이용하여 UI와 로직을 분리 (0) | 2020.08.10 |


